Wednesday, May 31, 2017

Frittata Squares with Spinach, Tomatoes, and Feta

Frittata Squares with Spinach, Tomatoes, and Feta Frittata Squares with Spinach, Tomatoes, and Feta

Think of frittata as an Italian cousin to the French omelet, with a few notable differences.

Instead of folding the omelet around the filling as the French do, Italian frittatas mix the eggs and filling together from the start and then bake them together in one dish. It’s a little like an open-faced omelet that can feed the whole family!

http://ift.tt/2rUTKQe

Make-Ahead Frittata Squares with Spinach, Tomatoes, and Feta

Make-Ahead Frittata Squares with Spinach, Tomatoes, and Feta Frittata Squares with Spinach, Tomatoes, and Feta

Think of frittata as an Italian cousin to the French omelet, with a few notable differences.

Instead of folding the omelet around the filling as the French do, Italian frittatas mix the eggs and filling together from the start and then bake them together in one dish. It’s a little like an open-faced omelet that can feed the whole family!

http://ift.tt/2rkR2AE

Tuesday, May 30, 2017

Sous Vide French Dip Sandwiches

Sous Vide French Dip Sandwiches

This recipe is brought to you in partnership with ChefSteps. ChefSteps is offering Simply Recipes readers $20 off both the new edition of their Joule sous vide immersion circulator and their flagship Joule through Thursday, June 1, 2017 — go check it out!

It seems like a magic trick: take a cheap, tough cut of beef, like a top round roast or a chuck roast, cook it for twenty-four hours without peeking, and Abracadabra! Now it’s suddenly filet mignon.

But it’s not magic — this is sous vide cooking!

For the past few months, I’ve been playing around with Joule, an immersion circulator from ChefSteps used for sous vide cooking, and I have slowly found myself won over by this new way of cooking. Have you ever heard of sous vide cooking? Or tried it yourself?

http://ift.tt/2sarmXq

Monday, May 29, 2017

Kaleidoscope Fruit Kabobs Recipe

Kaleidoscope Fruit Kabobs Recipe Kaleidoscope Fruit Kabobs Recipe

Want to feed your kids a tasty treat they’ll enjoy on a hot summer day? Make them fruit kabobs. The ingredients that you choose will vary based on where you live, but here is our favorite summer-time kabob recipe. If…

http://ift.tt/2sfl743

Caribbean-Spiced Shrimp & Vegetable Kabobs Recipes

Caribbean-Spiced Shrimp & Vegetable Kabobs Recipes Spicy Glazed Shrimp & Vegetable Kabobs Recipe

Take your dinner from boring to tangy with this Caribbean-Spiced Shrimp & Vegetable Kabobs recipe. These summer skewers are super easy to make and make a great treat for the beach or poolside. For a sweet treat during the day,…

http://ift.tt/2r5DV7X

Chicken with Basil and Lime Recipe

Chicken with Basil and Lime Recipe Basil Lime Chicken Recipe

Want a new way to prepare your chicken dinner? Make this Basil Lime Chicken recipe. Prepare the marinade during the day, and grill at night! Here are the step-by-step instructions on how to make this delicious summer recipe. Ingredients 3…

http://ift.tt/2r5GsiF

Mixed Berry Sangria

Mixed Berry Sangria Mixed Berry Sangria

Sangria is one of those things that you hardly need a recipe for – or even a particularly good red wine!

I do have a few slight twists I like use for my own sangria recipe. I like to add berries, like blueberries, raspberries, or strawberries. While apples and oranges are more traditional, I find berries infuse more flavor and color into the wine.

http://ift.tt/2qzP9hs

Warm Weather Meal Plan - Frugal Family Home

Warm Weather Meal Plan - Frugal Family Home

Happy Monday to You. Has warmer weather started where you live? We’ve had a few warmer days here and there but I know the warmer weather will be here to stay soon.

Menu plan with recipe links

We just finished our official homeschool year and now we are transitioning to a more relaxed schedule. We’ll still work on school subjects over the summer, but not as many each day and not as long. I try to find fun ways to sneak in education without my kids knowing.

Along with our school year ending and the permanent warm weather right around the corner, I’m adding more oven-free meals each week to our meal plan.

I try to turn off the oven and keep it off all summer long. When I need to bake, I’ll use our wood fired grill instead of the oven. But most of the time I try to grill or cook on the stove top during the warmer months.

When I don’t run the oven, our air conditioner doesn’t have to run as much making it less expensive to keep our home cool on those hot summer days.

I’m hoping to have a cool day to bake a loaf of french bread this week, but if too warm I’ll bake it in the barbecue.

We will also be having a lot of salad this week. See how to prep ahead salad for the whole week and keep it from getting wilted and soggy.

What’s cooking at your house this week?

Here are our Meals for this Week,

Dinners

This is the best and easiest homemade pasta sauce I’ve ever made. It’s so simple but tastes so delicious too. It only takes about 20 minutes to make too. Great for a quick and easy dinner any night of the week. If you can open a few cans and slice garlic you can make this delicious sauce in just minutes for a quick and easy dinner. Add in cooked ground beef or cooked sausage to beef it up.

Garlic Pasta Sauce over Pasta with Meatballs, French Bread, and Salad

Hamburgers, Macaroni Salad, Potato Salad, Fruit and Vegetables Sticks

Grilled Italian Chicken (from the freezer) on top of Salad with Homemade Croutons

Salmon Patties over Salad with Fruit and Homemade Tartar Sauce

Slow Cooker Chicken Fajitas, Refried Beans, and Spanish Rice

Grilled or Oven Baked Pizza, and Salad

Grilled World’s Best Chicken (from the freezer), Mashed Potatoes, and Salad

Lunches

Leftovers most days

Burritos (from the freezer) with Salad

Out to Lunch

Breakfast

I don’t think you can ever have too many breakfast recipes. This chocolate chip scone recipe is one of our favorites. These chocolate chip sones have no heavy cream, in fact they are dairy free scones. Another plus is you can make them in the skillet, so you don’t have to heat up the house on warmer days to bake them.

Toast with Eggs

Chocolate Chip Scones (baked in the skillet), Eggs, and Sausage

Eggs, Sausage, Hash Browns, and Toast

Where to find more menu plan ideas for this week.

Do you need help planning your menu? Find my menu planning tips here with a free printable menu planner page and here for  my frugal menu planning tips.


Find more menu plan ideas at Org Junkie too.

This post contains affiliate links. Thanks for your support.

http://ift.tt/2rdgeJe

Sunday, May 28, 2017

Tips for a Family Fun Night in the Backyard

Tips for a Family Fun Night in the Backyard

It feels like summer has officially started at our house, since school is out and that means that we’re starting up a new type of rhythm to our days. It’s one that we all love. It usually means that we have a little more free time and a lot more time to spend together. One of the things I love about summer is the ability to have some family fun in the backyard in the evenings.

Family fun night doesn't have to be complicated. Why not have your next family game night in your own backyard? Here are some easy tips to make it happen. | Real Life at Home

It looks like I’m not alone in that feeling. A new survey conducted by Harris Poll on behalf of TruGreen finds that nearly two thirds of Americans (156 million) report that some of their favorite memories have occurred right in their own yards. So, why not build some more family memories in your yard this summer?

While everyone’s family fun night in the backyard will look different, here are some of my tips for keeping it fun and doable.

Tips for Family Fun Night in the Backyard Keep Meals Simple

Whether you decide to grill out, cook over a fire pit, or just have sandwiches, if your primary goal is family fun, keep dinner simple. When we recently planned to have a family night together outside, we opted for sandwiches and chips, but I added a fun element to it that everyone enjoyed by picking up a fruit tray when I was at the store.

Simple dinner for family fun night in the backyard

Once summer really heats up, some homemade ice pops would make a perfect addition to the night!

Plan One Activity for the Whole Family

Your whole evening can be one activity or game that everyone joins in on, of course. But, at the very least, it’s fun to plan at least one thing that everyone can do at the same time. During our recent backyard family fun night, we all hung out together around the fire pit to talk and roast marshmallows for s’mores.

Family fun night doesn't have to be complicated. Why not have your next family game night in your own backyard? Here are some easy tips to make it happen. | Real Life at Home

Games and Activities Don’t Need to be Complicated to Be Fun

Since I knew everyone would like to not only do something together, but to also have some other choices for activities, I grabbed out lots of different options for people to do together.

It didn’t take lots of planning though, just a simple visit to the garage and game cabinet to grab up things like the beach ball, a ball bouncing game, sidewalk chalk, a playground ball, and Connect Four, which a couple of people had requested to play together in our “fort.”

Family fun night doesn't have to be complicated. Why not have your next family game night in your own backyard? Here are some easy tips to make it happen. | Real Life at Home

This offered lots of options for people to be active or creative together, but also offered everyone the possibility to do something they really wanted to do. A great thing about that was that people changed up what they were doing throughout the night so that everyone had a chance for some one-on-one time with a variety of family members.

Family fun night doesn't have to be complicated. Why not have your next family game night in your own backyard? Here are some easy tips to make it happen. | Real Life at Home

Other fun and low key things to do outside:

Family fun night doesn't have to be complicated. Why not have your next family game night in your own backyard? Here are some easy tips to make it happen. | Real Life at Home Crowd Source for Family Fun / Family Game Night Ideas

As the parent, you shouldn’t be the only one coming up with ideas for your family fun night. Turn the planning over to your kids! You could even give them a small budget and ask them to plan some backyard fun for your family for a night. You might be surprised with what they come up with!

Spend More Time Enjoying Family Time in Your Yard

The same survey by Harris Poll on behalf of TruGreen found that homebodies become “Yardbodies” in warmer months with Americans spending an average of 12 hours per week in their yards during the summer, much of that time may be spent working to maintain their lawns.

Family fun night doesn't have to be complicated. Why not have your next family game night in your own backyard? Here are some easy tips to make it happen. | Real Life at Home

While, yes, this post is sponsored by TruGreen, it’s also very honest of me to say that I’m thankful that because we use TruGreen to maintain our lawn, much of our yard work is limited to a tiny bit of weeding in our mulch area (which is not an area they take care of for us) and just mowing the lawn. It means that much of our summer yard time can be leisure time. Bonus!

I was selected for this opportunity as a member of CLEVER and the content and opinions expressed here are all my own.

The post Tips for a Family Fun Night in the Backyard appeared first on Real Life at Home.

http://ift.tt/2rej2YR

DIY Mason Jar 4th of July Decorations

DIY Mason Jar 4th of July Decorations 4th of July Decorations-DIY Mason Jar

Are you looking for easy DIY 4th of July decorations? These patriotic mason jar lights will only take you a few minutes to make; you can even get the kids involved. They’re a great way to show your pride on…

http://ift.tt/2rbqxOa

Saturday, May 27, 2017

Shrimp with Zucchini Noodles and Lemon-Garlic Butter

Shrimp with Zucchini Noodles and Lemon-Garlic Butter Zucchini Noodles with Shrimp and Lemon-Garlic Butter

A couple of years ago, I had a major bumper crop of zucchini. I found a million ways to eat it and cook with it, but this simple meal of shrimp with zucchini noodles and lemon-garlic butter was one I went back to again and again.

http://ift.tt/2qZyQ0W

Craft Project: DIY Patriotic Wreath

Craft Project: DIY Patriotic Wreath 4th of July Decorations-DIY Patriotic Wreath

Here’s a quick and easy DIY 4th of July decoration. This patriotic wreath is the ultimate in Americana decor because it combines Old Glory with the tried-and-true bandana – the symbol of cowboys everywhere. To make this patriotic wreath you…

http://ift.tt/2s1Jfrn

Friday, May 26, 2017

Oven-Roasted Salmon, Asparagus and New Potatoes

Oven-Roasted Salmon, Asparagus and New Potatoes Sheet Pan Salmon with Asparagus and New Potatoes

My dad pulled out a favorite recipe from his collection of decades old Food & Wine magazine to make and share with “the people on the website.”

A “discussion” then ensued between the rental units for at least half an hour along the lines of “What do you mean this is a favorite recipe? You always told me you didn’t like salmon.” “What are you talking about? I used to make this all the time.” “You’ve never made it in this house!…” and so on and so on.

http://ift.tt/1o9BFCk

Thursday, May 25, 2017

How to Add Privacy to Your Deck

How to Add Privacy to Your Deck Outdoor Privacy Screens

Even if you love your neighbors (but especially if you don’t) there are times you want to add privacy to your deck or porch. The same is true of a patio. While you may love to entertain, you also may…

http://ift.tt/2rVQSzL

Quick and Easy Homemade Waffle Pizza Pockets - Frugal Family Home

Quick and Easy Homemade Waffle Pizza Pockets - Frugal Family Home

Did you know you can make pizza pockets in a waffle iron? You can with this easy and quick waffle pizza pockets recipe.

Quick and Easy Waffle Pizza, when it’s too hot to bake pizza we make pizza in the waffle iron. These pizza pockets turn out crisp and melty, just perfect for a quick and fun pizza dinner or lunch.

We love pizza. We eat it at least two times a month but in the summer I don’t want to heat up the house by cooking pizza in the oven.

That’s why I came up with a couple of ways to cook pizza without an oven. We will grill pizza on our wood fired barbecue. It works great but can take a while to get up to the grill to the right temperature.

I can also make pizza pockets and bake them in a skillet instead of the oven. Again this works great but it can take a while for the cast iron skillet to get warm and it takes a bit for each batch to get browned.

Quick and Easy Waffle Pizza, when it’s too hot to bake pizza we make pizza in the waffle iron. These pizza pockets turn out crisp and melty, just perfect for a quick and fun pizza dinner or lunch.

Why Make Waffle Pizza Pockets?

When it’s hot outside and I’m in a hurry to get pizza pockets for our dinner or lunch cooked, I’ll cook them in the waffle iron.

The waffle iron is quick since both sides are baked at the same time. Making for short cooking time, about 3-5 minutes depending on your waffle iron.

I have a pretty good sized waffle iron and I can cook two at a time. In less than 10 minutes I can have a pizza pocket for each of our family members and have more starting to bake. Making it quick to get dinner or lunch on the table.

Plus if you like a crisp crust like we do, the waffle iron makes the pizza crust crisp. It’s a yummy crust coating on a layer or yummy cheese and pizza toppings. So very good!

If you are ready to make your own waffle pizza pockets, I’ve made a quick video to show how we make ours. In the video, we make pepperoni and olive pizza pockets, but any toppings you love should work well.

Ingredients Needed to Make Waffle Pizza Pockets

In the video, I mentioned the no rise pizza dough we like to use. If you need a quick and easy pizza dough this recipe is our go-to recipe we use every time we make pizza. It’s dairy free and egg free too.

If you don’t want to make your own dough, you can use purchased pizza dough from Trader Joe’s or WinCo Foods. Both of these stores sell pizza dough. You can also check with your local pizza shop and see if you can purchase dough from them, some of the stores will sell just the dough.

Want to make your own pizza sauce too? This is the pizza sauce recipe we use for our pizzas. With only a few ingredients and starting with tomato paste, it makes enough for 6 pizzas. It’s inexpensive to make too.

We also make our own pizza seasoning. I add the pizza seasoning mix to our pizza sauce but it’s also great to sprinkle into the dough as you are mixing to give the dough more flavor.

Even when making all of the items above from scratch we can get our pizza done and on the table in less than 20 minutes and for a fraction of what pizza delivered will cost.

If you like to have salad with your pizza like we do, if you prep ahead salad for the week you can have salad in just a minute or two. Find out how to prep ahead salad for the week without it getting soggy.

Quick and Easy Waffle Pizza, when it’s too hot to bake pizza we make pizza in the waffle iron. These pizza pockets turn out crisp and melty, just perfect for a quick and fun pizza dinner or lunch.

Tips for Making Waffle Pizza Pockets

You won’t need to spray the waffle iron. I’ve never had a problem with the pizza dough sticking to my waffle iron at all.

Make sure to heat your waffle iron while you are getting the rest of the ingredients ready and making the pizza pockets

Quick and Easy Waffle Pizza, when it’s too hot to bake pizza we make pizza in the waffle iron. These pizza pockets turn out crisp and melty, just perfect for a quick and fun pizza dinner or lunch.

Fold and pinch the pizza dough around the edges to seal in all the yummy pizza toppings. If it’s not sealed well, the ingredients might try to ooze out and burn.

Don’t’ be alarmed if your waffle iron rises and then falls as it’s cooking the pizza pockets. This can happen as the pizza pocket starts to cook it will rise quite a bit and then the pizza pocket will deflate as it cooks.

Quick and Easy Homemade Waffle Pizza Pockets
 
Prep time
10 mins
Cook time
5 mins
Total time
15 mins
 
Author: Shelly
Serves: 8
Ingredients
Instructions
  1. Start heating the waffle iron while making the pizza pockets.
  2. Divide the pizza dough into 8 pieces.
  3. Roll a piece of pizza dough into an oblong shape. I make my pizza dough pretty thin as I roll it out.
  4. Spread the pizza sauce over the pizza dough.
  5. Add toppings to one side of the pizza pocket.
  6. Fold the top over the toppings, roll the edge up, and pinch to seal. Then press the pizza pocket down to remove any trapped air.
  7. Place on preheated waffle iron and close.
  8. Let cook for about 3-5 minutes and then check for doneness. If the pizza pocket is golden brown, it’s done.
  9. Remove from waffle iron and continue cooking the rest.
  10. Serve warm with extra pizza sauce, if desired.
3.5.3226


The next time you have a desire for pizza on a hot day, skip the delivered pizza and make your own waffle pizza pockets. It only takes a few minutes and they are so very crisp and delicious.

More Pizza Related Recipes

Pizza Cups
Pizza Pinwheels
How to Grill Pizza

Pin it for Later….

Quick and Easy Waffle Pizza, when it’s too hot to bake pizza we make pizza in the waffle iron. These pizza pockets turn out crisp and melty, just perfect for a quick and fun pizza dinner or lunch.


http://ift.tt/2rVRxku

Wednesday, May 24, 2017

Delicious Bread and Butter Pickles Recipe (Quick and Easy)

Delicious Bread and Butter Pickles Recipe (Quick and Easy)

I’m a dill pickle girl. I have been since I was a little girl. Many years ago, when we were eating dinner at my parents’ house, my Mom offered us some homemade bread and butter pickles. I quickly declined. If it’s not dill, I don’t want it. (And I really dislike sweet pickles.)

But, when Eric had some, I decided to try a little taste. Then, I had to steal them off of his plate. Who knew? Those homemade bread and butter pickles were amazing!

Easy and Delicious Homemade Bread and Butter Pickles Recipe (no special equipment needed!) | Real Life at Home

So, just a few days later, I had to make my own batch. I was pleased at how easy they were to make. I also loved that I could make these homemade bread and butter pickles with no special canning equipment. Score!

pickling cucumbers

Easy and Delicious Homemade Bread and Butter Pickles Recipe

My Mom is pretty darn swell, so she picked up almost all of the ingredients I needed. (Mom for the win!)

The first step was to wash the pickling cucumbers that she had picked up for me. I forgot to count how many I started with. I think somewhere in the neighborhood of 14 – 16.

Next, I thinly sliced all of the pickling cucumbers. I ran out of room in the bowl I was putting them in, so you’ll see that I just stuck a cucumber’s worth in each of the big jars that I was getting ready to use.

I also chopped up the onion. And I cried. And I chopped some more, and I cried some more.

I am normally not crazy about onions, so I only used about half the amount in the recipe, but I decided that it was probably important to the recipe to actually put them in. (Plus, on the up side, the onions get pickled too, so they just taste a lot like pickles in the end.)
I filled up six jars with cucumber slices and chopped onions.

My Mom warned me many times to really jam the jars full of cucumbers and onions. I thought I had. Let me tell you — I definitely had not. Next time I make them, I am going to push much harder than this. They aren’t all that full, though they do look really full.

Update: Since I first shared this recipe in 2009, I have gotten much better at really packing things into the jars. Well, sometimes.

I combined one teaspoon Celery seeds, one tsp mustard seeds, four cups of sugar, two cups of white vinegar, and two tablespoons or salt.

(Quick note: If you don’t want to buy a whole container of the spices that you need for this, you should check if anywhere in your area sells spices by weight in bulk. I got some of mine at a local health food/natural living store.)

I boiled the mixture. I also got too close and sniffed just at the right moment, and it kind of burned my sinuses. Okay, maybe not really burnt them, but it was not pleasant.

Do you know what was less pleasant? When I did it again.

I’m funny about pouring boiling hot liquids. So, instead of pouring the boiling hot liquid from the pan straight into the jars, I used a super-sized mixing cup (okay, it’s really a bowl with measurements on the side).

quick and easy bread and butter picklesYummy! Hello pickles and onions and spices! You look so good.

delicious bread and butter picklesSo, here’s the proof that I did not pack in the jars full enough. See how each jar has quite a large area of liquid at the bottom? Yeah, you see it? Well, that’s the proof. (It got a little bit worse after this too!)

Printable: Homemade Bread and Butter Pickles Recipe
Delicious Bread and Butter Pickle Recipe (Quick and Easy)
 
Quick and Easy Bread and Butter Pickles Recipe
Ingredients
  • 1 teaspoon Celery seeds
  • 1 teaspoon Mustard seeds
  • 4 cups sugar
  • 2 cups vinegar
  • 2 tablespoons salt
  • 1 large onion
  • pickling cucumbers
Instructions
  1. Slice unpeeled cucumbers (thinly) and sliced onion into glass jars. Pack tightly.
  2. Bring spices, sugar and vinegar to a boil.
  3. Pour over cucumbers and onions.
  4. (Quick note: I didn't have enough liquid for the amount of cucumbers I had, but the nice thing is that the mixture comes together really fast. So, I just whipped up another ¼ batch of the liquid to finish up my jars. So, don't worry if you don't have the right amount.)
  5. Store in fridge. Mix occasionally. (Keeps for many months.)
3.5.3226

Enjoy! 

Easy and Delicious Homemade Bread and Butter Pickles Recipe (no special equipment needed!) | Real Life at Home

Other Recipes You May Love:

Easy Strawberry Freezer Jam | RealLifeAtHome.com

Easy and Delicious Homemade Blackberry Jam {No Special Equipment Required!}

Coconut Hot Fudge Sauce Recipe

Easy and Delicious Homemade Bread and Butter Pickles Recipe was originally published on September 8, 2009. It was last updated in May 2017.

The post Delicious Bread and Butter Pickles Recipe (Quick and Easy) appeared first on Real Life at Home.

http://ift.tt/2qmmEUs

Fudgy Chocolate Brownies

Fudgy Chocolate Brownies Fudgy Brownies

My mother often made these brownies on the spur of the moment. She’d see a bunch of kids in the house, and an hour later, she’d offer all of us a treat. “Let’s have a bite of brownie!” she would announce, and proceed to hand out small, warm squares.

I have no doubt that this recipe came from the back of a box at some point, but I only have the small index card she wrote in her beautiful penmanship. It’s a simple formula: chocolate, butter, sugar, eggs, and flour, all stirred together in one pot.

http://ift.tt/2qWwq3I

Tuesday, May 23, 2017

Quick Tip Tuesday: The Difference a Dollar Makes

Quick Tip Tuesday: The Difference a Dollar Makes I have been spending some time helping a friend clean out every last drawer and cabinet of her kitchen, and it has been a really fun and rewarding process. We are working on the project in phases to be sure we are addressing all of the family's needs. Step one was to take before photos and come up with a plan. Step two was to remove all of the cabinet contents and purge. Step three was to put things back where they made the most sense, based entirely on how the family utilizes their kitchen. And step four was to have them live with the first round of changes prior to adding any specific storage items. We are currently in the step four stage, no storage added, just cleaning out, purging and putting things where they make sense.


We have some more big projects planned for the space, as well as some additional re-arranging, and then I plan to share the entire process and after photos. In the meantime, we decided to do something that made an instant impact on a budget and I thought it would be a perfect quick tip to share.

Here is the cupboard before. This is in the process of moving items and cleaning things out and determining proper placement for the contents.


The contents were removed entirely and everything was wiped down. Then we added black poster board behind the shelves with very small pieces of double-stick tape to hold it in place (small amounts of mounting putting or glue dots would also work). A single piece of black poster board should cost no more than a dollar from any dollar or craft store. But this ridiculously simple act (no painting required), really makes the dishes stand out and heightened the overall feeling of the cupboard!


I have taken the time to paint foam core boards for a similar result, but that can be much more time consuming and the result in the black poster board was just as effective. Plus, the poster board is easier to work with; both cutting to size and layering if multiple sheets are required.

The Mr. of the house was also impressed and instantly mentioned how much he preferred the end result of such an easy change. He opened the cupboard and let out a "Woah!" which I always consider a major high-five moment.

Aside from the poster board, we didn't add any fancy organizers. Much of the difference really came down to storing items that belonged together in a single cabinet. 

As you can also see, there was a little debate about storing cups up or down. I once learned that glassware should be stored up so no moisture is trapped after washing, but was always raised with glasses stored down. Which do you prefer?


Next time you are at the dollar store, grab a sheet or two of black poster board and pop it in the back of one of your cabinets. There is sure to be instant gratification from such a simple step, and that gratification will continue to surprise you every time you open the cabinet door. The absolute best part is this project doesn't discriminate, it really works just about everywhere in any setting (think rentals, bookcases, nooks and medicine cabinets...).

Have I convinced you to give this quick update a try? What is your favorite dollar store purchase?

http://ift.tt/2qSaiau

Caring for a Rose Bush Tips, How to Care for Roses in Your Backyard Garden - Frugal Family Home

Caring for a Rose Bush Tips, How to Care for Roses in Your Backyard Garden - Frugal Family Home

Roses are so pretty and smell great too. If you are thinking about adding roses to your garden theses caring for a rose bush tips can help.

Tips to help you grow beautiful roses in your backyard garden. From planting to pruning, everything you need to know to grow roses in your garden.
This post contains affiliate links where appropriate, thanks for the support. 

We live in the city of roses, so it’s only fitting that we should have roses growing in our flower garden. Roses are one of my husband’s favorite flowers and we have quite a few.

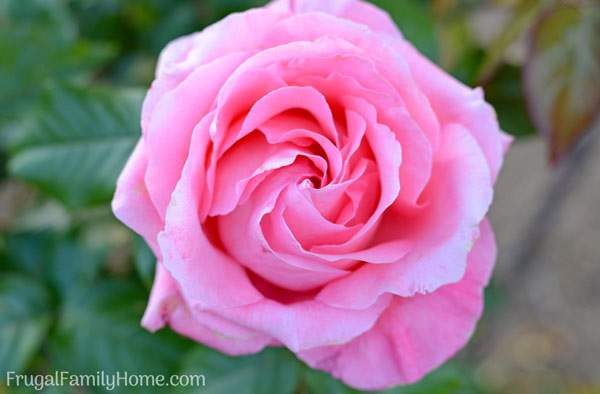
The one I love the most (the pink on pictured above) is an heirloom tea rose. It grows vigorously in our yard and has the most beautiful big blooms with so many petals and the scent it gives off is heavenly.

The only drawback to this rose is if we get rain the heads are so heavy once filled with water they droop and look sad.

When that happens I’ll remove the flower head and bring the petals in and place them in a bowl. The wonderful scent will fill the room for a day or two.

Below you’ll not only learn tips for caring for a rose bush but at the bottom of the post, you’ll find other DIY garden tutorials and guides from the Tuesdays in the Garden Bloggers. Be sure to scroll to the bottom to see what they have to offer this week too.

Caring for a rose bush tips to help you grow beautiful roses in your backyard garden. From planting to pruning, everything you need to know to grow roses in your garden

Caring for a Rose Bush Tips

The tips below can help you when caring for a rose bush. From planting to pruning you’ll find tips to help get your roses off to a good start and keep they growing.

The tips below are all things we do with our roses to keep them growing well and as disease free as we can in our rainy climate.

Rose Bush Planting and Care

The first question you might have is when is the best time to plant roses? We’ve found that spring is the best time for bare root or roses purchased in containers.

The majority of our roses have been purchased as bare root roses. They come in a much bigger variety than the potted roses at the garden centers.

They don’t look like much but a bag of sticks but that’s how they look after planting they’ll start growing and look more normal. Don’t let the way they look sway you away from them.

If you are planting bare root roses the best time to plant is in the spring right after the ground has thawed and all danger of a hard frost is past. Potted roses can be planted in the spring and through the growing season.

Although we’ve planted bare root roses into the beginning of summer and kept them well water and they did great but if you have a choice spring is the best time.

If you purchase bare-root rose plants you’ll need to soak the roots for at least 12 hours before planting. Plan on planting them after they have had time to have a good soak.

Dig a nice generous hole so you can spread out the roots. Then fill with dirt. Once planted be sure to water them well but don’t water so much that the rose is standing in water.

If you purchase a potted rose be sure to dig a hole big and deep enough to insert the whole root ball into the hole. This is where the bare root roses are easier, not as big of a hole to dig and when you have rocks in the ground every few inches this is a plus.

Before you plant your rose, you’ll need to consider how much sun your rose will get in the location you are planting. Roses need 6-8 hours of sun a day to grow well. I do have a few roses that only get 5 hours and do well but if you can locate them where they’ll get lots of sun that will be best.

Tips to help you grow beautiful roses in your backyard garden. From planting to pruning, everything you need to know to grow roses in your garden.

How Much Water Does a Rose Need

How much water does a rose bush need is a good question. Roses like lots of water to do really well. Maybe that’s why our roses look so full and lush because of all the good pacific NW rain we get all spring long.

How much you’ll need to water your roses depends on the climate you live in. You want the roses to get enough water to keep the soil around the roots moist but not wet. If the roots stay too wet the rose can struggle and if it’s too dry they will struggle too.

It’s best to start watering once every 5-6 days. Water deeply so the ground gets moistened about a foot deep. If you live in a dry climate you might need to water every 2-3 days.

Mulching can help to retain the moisture in the soil and I mulch each year with compost around my roses.

The way you water is also important. You don’t want to water from above as that can contribute to rose diseases like black spot.

It’s best to water around the base of the plant keeping the leaves dry. I use a soaker sprinkler and turn it upside down so the water doesn’t spray up but down instead. This soaks the ground around my roses and waters them deeply.

Another option is an actual soaker hose placed in the rose bed and it seeps water out slowly and doesn’t spray at all.

The main things to remember about watering roses are to water often enough to keep the ground moist but not so wet the ground is soaked. Water from below and try to keep the leaves dry to prevent disease.

And finally water deeply when watering since light sprinkling on the top will not help the rose grow well.

Caring for a rose bush tips to help you grow beautiful roses in your backyard garden. From planting to pruning, everything you need to know to grow roses in your garden

Rose Care and Feeding

Feeding roses can be as involved or as easy as you like. You can add organic fertilizer in the spring. I like to add a good amount of compost all around the rose bed. This seems to feed the roses well.

Also in the spring and fall, we will sprinkle Epsom salt around the base of each rose. Then work it into the soil around the base of the rose bush.

And finally, about every 4 weeks during the growing season I will use Miracle-Gro  or a powdered rose fertilizer around our roses to keep them growing well.

These simple steps feed our roses and keep our rose bushes growing well.

Caring for a rose bush tips to help you grow beautiful roses in your backyard garden. From planting to pruning, everything you need to know to grow roses in your garden.

Caring for a Rose Bush, Rose Pruning

Rose bushes do need regular pruning to keep their shape and to remove any dead, dying, or diseased wood.

You’ll also want to prune them back each year to keep your rose bush a good size and shape you want. We’ve found it’s best to trim the roses back to about waist height after the growing season as we are going into winter. Then we prune again right around President’s Day to about knee height.

When pruning be sure to use clean, sharp, pruning shears. You don’t want those cheap shears that can crush the canes as they cut, you want a nice clean cut. You’ll also want gloves to protect your skin from thorns.

When cutting cut at a 45-degree angle about 1/4 inch above a bud. A bud is a little red or brown protrusion on the cane, it’s different from the thorns.

You’ll also want to clear out canes out of the middle of the plant if it is too crowded. If the plant is too crowded the leaves can stay wet and disease can set in. Thin out the plant so all the leaves get good air circulation.

It’s also good to remove any leaves to about 6 inches off the ground. This helps to protect the rose bush from black spot.

You’ll also want to deadhead the roses regularly to keep them blooming all season long. We watch our rose blooms and as they start to lose their petals we will trim those spent blooms off the plant. We count down 5 leaves and make a 45 degree cut 1/4 inch above a bud just like spring and fall pruning.

Rose Bush Care, Pest and Disease Control

If you are going to grow roses you’ll have to do some pest and disease control. But with proper care, your roses can really stay looking great but every year even with the care we give our roses we end up with black spot and aphids.

At the first sign of aphids, we attack with this homemade aphid spray. It works really well to kill those little sap suckers. We only apply it when we see aphids on the bush. We’ll spray the bush well and let it dry.

The next day I’ll check for aphids again. I may see aphids on the bush but most of the time they are dead. If any are moving I’ll spray in those areas again.

Black spot is a little harder to battle. It’s a fungus that attacks the plant. When we see black spots forming on our rose leaves, we will immediately remove those leaves and dispose of them and any contaminated leaves on the ground around the plant.

There are fungus sprays that some people use but I try to avoid them and use trimming instead. I’ve also heard that some gardeners using a tablespoon or two of baking soda mixed with a gallon of water and a few drops of dish soap. Then spray it on both sides of the leaves to kill the fungus.

I haven’t tried the baking soda solution but it seems to be a good solution to rose fungus. Neem oil  is another solution to fungus on roses which we have tried in the past with mixed results.

Powdery mildew is another fungus that can plague roses. Luckily we don’t usually have to deal with that here but in humid climates, it can be a problem. The neem oil should help with powdery mildew too since it’s a fungus also.

That’s it, those are my caring for a rose bush tips. I hope you found something new to try this year to keep your roses looking great, growing well, and producing beautiful blooms.

Tuesdays In the Garden

Learn something new in gardening.

Now let’s get to what the other Tuesdays in the Garden bloggers have to share this week. To be taken to their tips and project just click the photos below.

Leaf Embossed Bird Bath   Where to Find Mulch   Aphid Control   Cane berry care     How to Grow Strawberries   How to Plant kid friendly

Pin It for Later….

Tips to help you grow beautiful roses in your backyard garden. From planting to pruning, everything you need to know to grow roses in your garden.

http://ift.tt/2qLKInh