Friday, June 30, 2017

BBQ Bacon Jalapeño Poppers

BBQ Bacon Jalapeño Poppers BBQ Bacon Jalapeño Poppers

This post is brought to you in partnership with Stubb’s Bar-B-Que 

As we all know, bacon makes everything better. You know what, though? So does barbecue sauce!

These spicy grilled jalapeño poppers are stuffed with an addictive mix of Stubb’s Sticky Sweet Bar-B-Q Sauce, cheddar and cream cheese, and glazed bacon before being grilled until hot and bubbly.

http://ift.tt/2suodkq

Thursday, June 29, 2017

Italian Sausage Stuffed Zucchini

Italian Sausage Stuffed Zucchini Italian Sausage Stuffed Zucchini

Fellow gardeners, you know this tale well. You step away from your garden bed for 1 minute (or a weekend) and come back to find a monster zucchini hiding in the greenery.

Sometimes the plant warns you. Regular zucchini production starts slowing down, odd for early summer. The reason? All of the plant’s attention is going to feeding that one humungous baseball bat of a zuke.

Fortunately, those ginormous zucchinis are perfect for stuffing!

http://ift.tt/2upaWLg

Wednesday, June 28, 2017

Before & After: An Organized Client Pantry Project

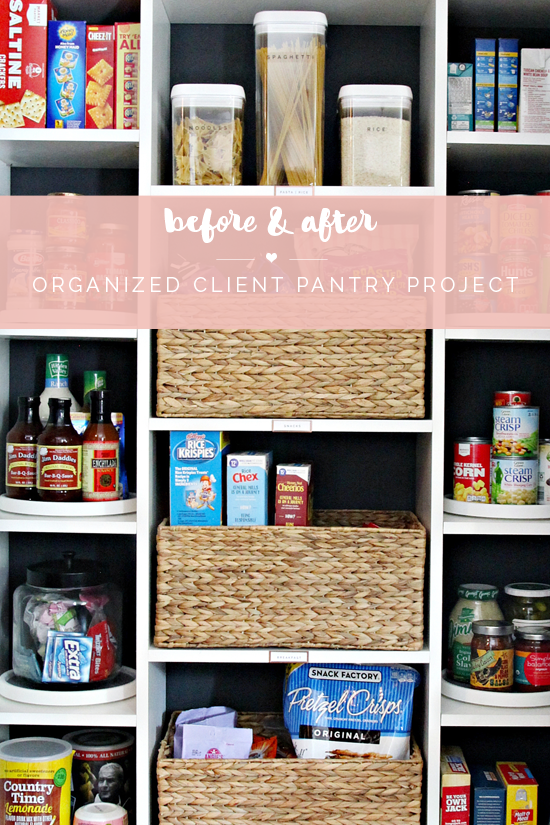
Before & After: An Organized Client Pantry Project I have been working with a friend on her kitchen over the past few months, and we are nearing the end of a multi-cabinet, drawer and closet overhaul. Installing and organizing a new pantry system was one of the biggest check boxes on our to-do list, and we are both thrilled with the end result.


But let's back up for a second. As I mentioned, this is part of an entire kitchen and mudroom organizational makeover, and we have been doing our best to design their highest traffic rooms into spaces that work hard for them (so they don't have to work hard to maintain them). I am working closely with this super sweet family of five who eat the majority of their meals at home 6-7 days of the week. Mom meal plans, but she also purchases quite a few items in bulk 1-2 times per month, with the exception of weekly produce and dairy. When I did my initial walk-through, the first thing that caught my attention was that they were storing food in a pantry closet as well as 3-4 miscellaneous cabinets throughout the kitchen.

Here is a look at the pantry during my initial visit.


A system had been installed to make room for some cleaning tools, but there was very little flexibility and the closet definitely wasn't being utilized to its full potential.

Our very first step was to empty every last cabinet and drawer in the kitchen and go through the sorting process. We paired things down, categorized, and put everything back in cabinets based on how the family uses the kitchen throughout the day. This was step one, and I asked for them to live with the ideas and changes for awhile before we got too wild and crazy with any storage purchases.

Being that I categorized all of their pantry/dry foods together, I recommended moving them all to the pantry closet. That would mean moving the cleaning tools to the adjoining mudroom and installing a pantry system that could offer flexibility combined with a plethora of fabulous food storage.

I brainstormed quite a few options, but the goal was to give them floor to ceiling shelving with dividers to offer some sorting/compartmentalizing. I also wanted to give them flexibility paired with open and concealed storage. I considered everything from DIY systems to pre-designed high-end closet options. Ultimately, the DIY route won so we could create our exact vision and on a pretty reasonable budget.


The entire closet is 43" wide and about 13" deep. The door is almost center, the right side has an inch or two of extra wall/trim more than the left. We had been sourcing a few food storage solutions online, and they already owned and utilized a wooden craft crate. The common width was 18" for both the crate and the woven baskets that we preferred. So it was set that the center of the closet would consist of 18" wide shelving, and the outer banks of shelves would be pegged to offer some height differentials. These smaller shelves would also be the ideal location for a few lazy susans, which are my number one way to make the most of an awkward nook.

Above you can see the original plan we came up with for the product placement. This was based on their existing inventory, and also considered many of the reoccurring purchases that are made each week. I drew out the plan and presented it to their family receiving a thumbs up to move forward.

Bryan and I removed the existing closet system and then scraped, patched and painted the walls. While the paint dried, we took a trip to our local Home Depot for the product. With the depth of the closet at 13", we were able to design the new system completely out of 12" melamine boards, a combination of both the pegged and smooth options.


To assemble the unit, we cut the four vertical pegged boards to the height of 75". We screwed through the boards into each 18" wide shelf to create the center tower and plugged/concealed the screws with these. We measured a large box of cereal and spaced the center shelves accordingly. The pegged side of the vertical boards faced the outside of the tower, and the remaining two pegged boards were screwed into the side walls of the closet. Lastly, smaller boards were cut to size and were added to the system with these pegs and we trimmed the floor with base molding.

Above you can see I painted the interior of the closet a stunning deep gray. I did this for a couple of reasons. First, I always love a painted closet because something so simple instantly amplifies the project by 1000%. Especially when you can use a bold color and pair it with simple white shelving. You can check out how I used poster board in her nearby cabinets for a similar effect. Secondly, the deep gray was leftover paint from adjoining rooms, including her darling half bath (which also adorns this floral wallpaper that I am lusting over). Now everything ties together beautifully and looks intentional and custom.


There is something so ridiculously satisfying about the process of creating a plan and watching your vision come to life. It's a shame this closet has a door because the end result is too good to be concealed away.


A few favorite things in this project to point out. We planned ahead and made sure to measure every center cubby to fit bulk boxes and packaging, but also wanted to make sure to leave just enough room at the top to place a row of baskets to tuck away entertaining/party items. This includes paper napkins, banners, candles, etc.... Target has been selling the Y-Weave style basket for years and it sure is a popular choice and for good reason. They are versatile and pretty and lightweight and easy to clean. #supercrush And they truly conceal the assortment of items that live inside.


You will notice labels on the white baskets as well as down the center of the pantry. Another favorite of mine are these adhesive labels found at the Container Store. I pick up a couple of packs during every visit in fear they will someday stop selling them. For this project, I paired them with some copper spray paint to mesh with my client's style.


The labels hold pretty well, but we did need to reinforce them on the white baskets with a small dab of hot glue due to the basket's texture.


I am a long time fan of air-tight clear canisters in a pantry. They streamline things, give you a quick visual inventory and prolong freshness. In this situation, I provided two bins for spaghetti as they will purchase both regular and gluten-free noodles. Same story for the other pasta types. I am often asked about cooking instructions/details and those can always be taped to the back of the canister or under the lid if necessary. We decided that four regular pasta canisters and two spaghetti sized canisters would be a good fit for the pantry and their typical supply levels.

I went on a wild goose chase looking for something fairly reasonably priced, that all matched and fit the available space on the shelving. Store after store I was coming up short finding matches and sizes until I found these online (this size for spaghetti and this size for all other boxed pasta). They checked all of the criteria boxes and I must say that they are pretty dreamy. I love the flip-lock lid and the sizes offered and that they could be mixed and matched vs. purchased as an entire set. I labeled the canisters with some leftover Waterslide Decal Paper, which is how I also labeled our own spice jars a couple of years ago.


We contemplated adding some sort of drawer or pull out wire basket to the center column, but ultimately decided to just use woven baskets for a little additional space and flexibility. The shelves are only 12" deep so not much is lost in the back (which is always a win!), but the baskets allow the contents to be pulled out and accessed easily.


I added a few of these compartment organizers to provide a little extra division inside of the larger baskets. These organizers also fit nicely up in those white Target baskets as well!


The corner shelves are perfect for smaller packages, boxes, cans, and jars, and you just can't go wrong with a good turntable. We added a total of six and they can hold anything from canned fruits and veggies to pasta jars, dressings, salsas, and soups. Nothing lost and everything always at their finger tips! I definitely need to add a few more of these to our own cupboards.


We also wanted to get her produce corralled all together, as some types were living in the pantry and others were out on the counter and some were in a cupboard across the way. I have heard and read that storing onions near potatoes can cause them to go bad faster. That may be the case, but we have been storing ours in the same drawer for a few years now and we generally go through our veggies before they have time go bad. With some meal planning, it should be OK, but if you purchase veggies in bulk and want to prolong their life, you may want to store them in different locations. For this pantry, Bryan and I modified their existing wood crate to divide and hold all of the produce.


I will share the full tutorial for the crate soon, but there is a liner at the bottom which can easily be removed and cleaned, and the casters allow the crate to roll out like a smooth drawer. The floor worked out for also storing other bulk items such as water, boxes of sports drinks and juice.

Last but not least, we found a remote light that we were able to add just inside the pantry door to be sure it never gets too dark when looking for goodies.


The remote is tucked just inside the door like a light switch.


So what does the family think? They are all loving having everything in one easy-to-see-and-find place and it has already made a big difference in how they plan and shop for their meals. And better yet, it freed up a lot of other cabinets in the remainder of the kitchen and allowed us to better utilize the kitchen as a whole. I can't wait to finish up a few more of those areas and share the rest of the story with you soon.

As tradition goes, no good before and after makeover would be the same without a final side-by-side view of the changes.


OK, to recap quickly... Paint the interiors of your closets, it makes magic happen! When planning out the project, always consider your shopping habits, typical inventory, how you use the space and leave a little extra room for wiggling, change, and growth. Select items that are easy to maintain and won't add stress, but ultimately reduces it. Work with awkward nooks and the depth by adding turntables and pull out storage. And remember, those little details make a huge difference in the end result. #labelsforthewin


JavaScript is currently disabled in this browser. Reactivate it to view this content.


I will be back soon to share more details for the DIY divided rolling crate! Happy organizing friends!

http://ift.tt/2sS1kL6

Best Real Estate Broker in Baltimore Maryland | Kirk Home Group | Real Estate Broker Baltimore

Best Real Estate Broker in Baltimore Maryland | Kirk Home Group | Real Estate Broker Baltimore Best Real Estate Broker in Baltimore Maryland | Kirk Home Group | Real Estate Broker Baltimore
The Kirk Home Group: Best Real Estate Broker in Baltimore Maryland http://ift.tt/2soveTw 443-929-4550 The Kirk Home Group Lutherville reviews 5 Star Review Jon's an expert. Without a doubt he does his research, learns the market, and really makes the most out of each opportunity, and is very professional every step of the way. Thank you Jon being so bold in your efforts to help us achieve our dream. I hope that you'll accept my compliment: You're a great realtor and team leader. And we wish you tremendous success. Thanks again. The Kirk Home Group 2331 York Road Lutherville Maryland 21093 Check us our on Facebook: http://ift.tt/2s3Rtik https://www.youtube.com/watch?v=dLuO4_SfnsI

Best Real Estate Agent in Baltimore | The Kirk Home Group | Real Estate Agent Jonathan Kirk

Best Real Estate Agent in Baltimore | The Kirk Home Group | Real Estate Agent Jonathan Kirk Best Real Estate Agent in Baltimore | The Kirk Home Group | Real Estate Agent Jonathan Kirk
Looking for the best realtor in Baltimore? Contact Jonathan at the Kirk Home Group in Baltimore Maryland and get the best real estate service in Maryland! http://ift.tt/2soveTw or call 443-929-4550 to speak with a live Kirk Home Group agent Check out our 5 Star Review below and discover why we are voted best in Baltimore! Jon's an expert. Without a doubt he does his research, learns the market, and really makes the most out of each opportunity, and is very professional every step of the way. Thank you Jon being so bold in your efforts to help us achieve our dream. I hope that you'll accept my compliment: You're a great realtor and team leader. And we wish you tremendous success. Thanks again. The Kirk Home Group 2331 York Road Lutherville Maryland 21093 Check us our on Facebook: http://ift.tt/2s3Rtik https://www.youtube.com/watch?v=ScTsjFZkRGs

Mint and Lime Mojito

Mint and Lime Mojito Mojito

We can wax on about the glory of the mojito – this perfect concoction of rum, mint, sugar, lime juice, and sparkling water — but I’m guessing you won’t need a lot of convincing in that regard.

Instead, let’s discuss the building of the mojito, which in my opinion, is what distinguishes a “good” mojito from a “truly incredible” mojito.

http://ift.tt/2smUiu9

Tuesday, June 27, 2017

Memphis-Style Pork Ribs

Memphis-Style Pork Ribs Memphis-style Pork Ribs

There are wet ribs, sticky with a succulent, spicy barbecue sauce, and there are dry ribs, where the flavor is all in the dried mixture of herbs and spices, melded into something greater than the sum of their parts by time, smoke and pork fat.

This is what they do in Memphis, Tennessee, and it’s why Memphis-style ribs are some of the best in the world.

http://ift.tt/2seAVs3

15 Recipes for a Summer Cookout with California Ripe Olives

15 Recipes for a Summer Cookout with California Ripe Olives

This round-up is brought to you in partnership with the California Olive Committee.

Dreaming up a menu for your next summer cookout? Look no further than one of our favorite pantry staples, olives.

The buttery, mild flavor of both California green and black ripe olives are a fantastic contrast to all of the smoky flavors coming off the grill this summer. You can chop them up into a quick tapenade to serve with chips, make a quick relish to spoon on top of burgers, or toss them with fresh summer vegetables in a pasta salad.

Here are fifteen recipes that put a can of olives to work, guaranteed to make your next cookout a memorable one!

http://ift.tt/2tSiRRX

Quick and Easy Rhubarb Crumble Coffee Cake - Frugal Family Home

Quick and Easy Rhubarb Crumble Coffee Cake - Frugal Family Home

This is a quick and easy breakfast recipe for rhubarb crumble coffee cake. It’s a yummy way to use some of the rhubarb you have growing in your garden.

I’m always on the lookout for great recipes that I can use your garden produce in. There is something that is so satisfying about harvesting a fruit or vegetable from your garden, bringing it in and preparing it for friends and family.

Skip muffins for breakfast and make this easy rhubarb crumble coffee cake recipe. It’s a simple recipe that’s quick to make. In a pinch you could quickly make this for dessert too.

You know exactly where that item was from the time it started to grow to when it ended up on your table.

This week the Tuesday in the Garden bloggers and myself are sharing a few garden to table recipes. I’m sharing a new recipe I made for rhubarb crumble coffee cake, which you’ll find below.

But be sure to scroll all the way down to the bottom to see what recipes my blogging friends have to offer too. They are all great cooks and bakers so I know you’ll love their recipes.

My choice for a garden to table recipe was decided by what I had ready to pick in my garden. I got a late start to my garden this year, then the poor garden has been hindered by our continual rain and cool temperatures.

Skip muffins for breakfast and make this easy rhubarb crumble coffee cake recipe. It’s a simple recipe that’s quick to make. In a pinch you could quickly make this for dessert too.

I love the cool temperatures and rain this time of year but it’s not great growing weather. So as I looked around my garden I spotted lots of rhubarb ready to pick.

Rhubarb is a fruit, or maybe it’s a vegetable, I’m not really sure about that but it’s something that grows really easily in our garden. I love it because once it’s planted and established it keeps giving year after year.

You only eat the stocks, not the leaves. I’ve heard the leaves contain a compound that poisonous so don’t eat the leaves, throw them out and only eat the stocks. I wonder who figured out the stocks were fine to eat but not the leaves.

Once you have your stocks of rhubarb harvested clean them up and cut the ends off. And they are ready to use in recipes.

I’ve made rhubarb recipes for ice cream and crisp and even jam. But I wanted to make a recipe that we could eat for breakfast. We always end up with lots of rhubarb in the freezer and having a way to use it in a yummy breakfast dish would be nice.

Skip muffins for breakfast and make this easy rhubarb crumble coffee cake recipe. It’s a simple recipe that’s quick to make. In a pinch you could quickly make this for dessert too.

My son suggested muffins, he loves muffins. But I thought what about a coffee cake? It’s something I don’t make that often, so it would be special but it’s close enough to a muffin that my son would also love it.

Plus if you have unexpected company come by you can make a coffee cake really quick.

Who can resist a little crumble topping on top? That’s one of the reasons coffee cake is so good.

How to Prepare Rhubarb for the Freezer

If you want to enjoy this yummy dish even when your rhubarb isn’t producing, prepare the rhubarb for the freezer.

Harvest your rhubarb, wash and dice it. Then place it in a zipper freezer bag in 2 cup portions and freeze. It’s that easy and you’ll have rhubarb waiting in the freezer when you have a craving for this yummy rhubarb crumble coffee cake.

How to Make Rhubarb Crumble Coffee Cake

I’ve made a quick video to show the steps of this recipe and you can print the recipe below. After you’ve done that scroll down to see what recipes the other Tuesdays in the Garden bloggers have to offer from their garden harvests.


Rhubarb Crumble Coffee Cake
 
Author: Shelly
Serves: 9 pieces
Ingredients
  • 2 cups Flour
  • ¾ cups Sugar
  • 1 tablespoon Baking Powder
  • ½ teaspoon Salt
  • 2 cups Rhubarb, diced
  • ¼ cup Oil
  • ¾ cup Milk
  • Crumble Topping
  • ⅓ cup Flour
  • ½ cup Brown Sugar
  • ½ teaspoon Nutmeg
  • ¼ cup Butter or Margarine
Instructions
  1. In a large bowl combined flour, sugar, baking powder, and salt. Whisk until combined.
  2. Add the diced rhubarb and toss to coat with flour mixture.
  3. Add oil and milk and stir until the dry ingredients are moistened. Be careful not to over mix.
  4. Spread into a greased 8-inch square baking pan. Set aside.
  5. In a medium bowl combine flour, brown sugar, and nutmeg for the crumble topping. Whisk to mix well.
  6. Cut butter into the brown sugar mixture until the mixture is combined and crumbly.
  7. Sprinkle crumble topping onto the coffee cake batter and bake at 375 degrees for 45 to 50 minutes. Test for doneness by pressing a toothpick into the center of the coffee cake if it comes out clean, it's done.
3.5.3226


This week we have a few yummy garden to table recipes to share. Just click on the photo below to be taken to the recipe. Enjoy!

Zucchini Skillet   zucchini-gratin   Roasted Peppers Parmesan    Zucchini Corn Dish     

More Rhubarb Recipes You’ll Love

Roasted Rhubarb Ice Cream
Rhubarb Custard Crisp
Easy Rhubarb Jam

Pin it for Later…

Skip muffins for breakfast and make this easy rhubarb crumble coffee cake recipe. It’s a simple recipe that’s quick to make. In a pinch you could quickly make this for dessert too.

http://ift.tt/2thZ4hf

Monday, June 26, 2017

Pressure Cooker Chipotle Chicken and Rice Bowls

Pressure Cooker Chipotle Chicken and Rice Bowls Pressure Cooker Chipotle Chicken and Rice Bowls

My husband is a big fan of chipotle – both the spicy, smoky peppers themselves and the restaurant chain. He declared this dish to be better than Chipotle’s fast-casual burrito bowls, so I’m calling it a win!

This is certainly more budget-friendly than ordering take-out for four people. It also cooks in about the same time that it would take us to drive over and pick up dinner!

http://ift.tt/2te39mN

Fun Summer Learning Activities: 10 Ways to Keep Learning During Summer Break

Fun Summer Learning Activities: 10 Ways to Keep Learning During Summer Break

Fun Summer Learning Activities: 10 Ways to Keep Learning During Summer Break is a post from contributing writer Kris Bales from Weird, Unsocialized Homeschoolers.

Alternately titled, “All the things we would do over the summer if I could get my act together.”

Looking for learning activities for the summer? Here are 10 ideas for fun supplemental learning ideas to keep kids actively engaged during the summer months.

In total transparency, I want to say: We’re pretty lazy in the summer. We enjoy our downtime and following our own interests, which typically involve too much screen time. That being said, I’ve often had these grandiose ideas of what I’d like to do over the summer to enhance or supplement our regular school year studies. Since they may never happen for us, I thought I’d share some summer learning activities with you – in case you’re a little more together than me.

Since they may never happen for us, I thought I’d share them with you – in case you’re a little more together than me.

Fun Summer Learning Activities: 10 Ways to Keep Learning During Summer Break 1. Do a fun geography study.

I was once in a homeschool forum with a lady who did an around the world summer study with her kids. They “visited” a different country each week. They’d learn about the culture, make a dish (or a whole meal) from that week’s country, and make a related craft or costume.

That would be so much fun! You could get really elaborate and make or buy a passport that you could stamp for each country. A fun literature tie-in might be Around the World in Eighty Days.

Learn More: How to Plan an Around the World Day

2. Take an art class.

You can often find classes through local museums, art stores, or community centers and summer can be a great time to take advantage of local offerings.

Alternately, you could jump into that art curriculum or online class that you’ve been intending to get to all year. I may even eventually get around to remembering to buy some chalk pastels so we can enjoy Tricia Hodges book, A Simple Start in Chalk Pastels. This summer may be our year to finally do something on my summer fun list!

Another option would be to work your way through drawing and art lessons on Art for Kids Hub.

Art For Kids Hub

3. Teach your kids a life skill.

Okay, this one may not be so much fun for the kids, but it will definitely be beneficial – especially as they get older. Finding the time to teach your kids to cook, wash clothes, or do some housekeeping chores is much easier in the summer and will give you some extra time during the school year when the kids can help take over some of the household chores that have been your responsibility in the past.

Learn More: Check out our “teaching life skills” archives

Training Your Children in Home Economics eBook

Training Your Children in Home Economics eBook

4. Learn to play a musical instrument.

There seems to be an online tutorial for just about everything these days. If you can’t afford (or just don’t want to take) traditional classes, a self-paced, online approach could be just the ticket. The cool thing about learning this way is that it tends to be more interest-led, therefore generally more appealing to everyone involved.

Learn to Play Ukulele Kit

5. Read lots of books.

A couple of our local libraries have started offering summer reading programs for teens. I’m so excited about that because my kids are older now and, while they often participated in the summer reading program when they were little, it’s too “babyish” for them now. Because all three of my kids should be the right age for the teen program this year, we may actually pursue this one and not just think about it.

Even if your library doesn’t offer a summer reading program, you can make up your own. Offer incentives for reading a certain number of pages, chapters, or books. In the past, I’ve put together a bingo card as a reading incentive. The cards included different types of books in each square. Examples include: a biography, a book about a boy, or a non-fiction book.

Also, don’t think “read lots of books” means your kids have to be doing all the reading. No matter their ages, most kids still enjoy a good story. Reading aloud doesn’t have to stop once our kids are independent readers. Spending some time lying around the living room enjoying a good book together can be a great way to connect with older kids, too.

6. Go on some fantastic field trips.

If you’ll be traveling this summer, consider the “field trip” opportunities that may arise. You don’t have to turn everything into an educational moment (not overtly, anyway), but one of my family’s most memorable field trips was a couple of extra days spent in St. Augustine, Florida on the way home from the beach.

If you’ll be traveling, see if there are any great sites along your route that may reinforce something you studied over the past year or something you’ll be studying in the upcoming year.

Oh, and that “around the world” idea in #1 could be turned into a fantastic U.S.A. (or whatever your home country) version, if you’ll be doing a lot of driving on your travels.

7. Study poetry.

Poetry may be something that makes its way into your everyday homeschool life, but that doesn’t tend to happen in my home. Summer can be a great time to do some poetry study. You could look at a different poet or a different type of poetry each week.

Learn More: Hands-on Poetry Project Ideas

8. Invest in a hobby.

Whether you enjoy writing, photography, art, music, or rock collecting (here’s a way to build your rock collection), those lazy summer days (do they really exist?) can provide a wonderful chance for you and your kids to each spend more time on your hobbies – or share them with each other.

Do you have a child who would love to learn what you know about photography? Maybe one of your kids would enjoy teaching you to draw anime. Sharing each other’s interests can be a wonderful way to connect.

How to Teach Your Kids about Photography

9. Go bowling.

So maybe bowling doesn’t constitute learning, but it’s fun. It’s physical education (P.E.) and homeschoolers don’t usually get enough P.E., right?

Lots of bowling alleys offer summer programs in which kids bowl free. Those that do also usually offer a great rate for parents to purchase unlimited bowling, too. This is something that I really want to do this summer. My kids don’t love bowling as much as my husband and I do, but they usually do enjoy a game or two.

The shoes tend to be the most expensive part, so I’ve been on the lookout for some good deals on bowling shoes. I have a pair in each of our sizes sitting in my Amazon wishlist if I don’t find a better deal on some locally soon.

10. Enjoy more family time.

Alright, while some of the other ideas may be on my “wish we did this” or “would like to do this” list, this last one is something we definitely do. It’s fun to enjoy more time together while the weather is nice – either by doing more active things together outside (like family bike rides) or enjoying fun summer treats like dollar scoop night at the local ice cream shop.

How does family time constitute summer learning? I could give you lots of buzz words that would fit, but the fact is, family is what it’s all about, whether you’re actively trying to learn something or not.

In what ways does your family enjoy spending more time together during the summer? If you take a summer break, do you take time completely off or do you enjoy some fun, supplemental learning?

Other Posts You May Love:

30 Fun Summer Ideas for Tweens and Teens

15 Cool and Refreshing Homemade Ice Pop Recipes | Real Life at Home

Summer Campout Activity Pack | reallifeathome.com


Looking for summer learning activities? Here are 10 ideas for fun supplemental learning ideas to keep kids actively engaged during the summer months.

Disclosure: This post contains affiliate links. They don’t change the price you pay. However, when you shop through them, we may receive a small compensation. Thanks!

Fun Summer Learning Activities: 10 Ways to Keep Learning During Summer Break was originally published on May 28, 2013. It was most recently updated in June 2017.

The post Fun Summer Learning Activities: 10 Ways to Keep Learning During Summer Break appeared first on Real Life at Home.

http://ift.tt/2tdilkk

Saturday, June 24, 2017

American Flag Pie

American Flag Pie American Flag Slab Pie

Looking for something special to bring to a Fourth of July cook-out? Check out this American Flag Pie! It’s a sheet-pan slab pie with a homemade crust, a blueberry and strawberry filling, topped with stars and stripes.

Slab pies are shallower than regular pies, but they make up for it in width. A 13 x18 sheet pan pie will easily feed 12 people, perfect for a party.

While conceivably you could use a prepackaged folded frozen pie crust (just get four of them and cut them to fit the rectangular sheet pan, and cut out the shapes), I strongly encourage you to try the home made crust recipe I’ve included for this pie.

http://ift.tt/2t30RWM

Budget Grocery Haul, Grocery Outlet and Fred Meyer - Frugal Family Home

Budget Grocery Haul, Grocery Outlet and Fred Meyer - Frugal Family Home

For this budget grocery haul, I stopped two stores. Most shopping trips I’ll shop at one to two stores. I find I can find really good deals by shopping more than one store each week and it really doesn’t take too much time to make two quick stops.

This week's budget grocery haul for our family of 4.

For this budget grocery haul, I shopped at Grocery Outlet and Fred Meyer. I was able to find quite a few good deals at each store and I spend just under $30 at each store too.

You can watch the quick video below to see my full budget grocery haul. Or scroll down to see the best deals I found this trip.

Best Deals this Budget Grocery Haul Trip

Granola Bars $.99 a box
Wheat Thins $1.67 each used $1/2 coupon and $1.20/2 Checkout 51 coupon, Paid $.57 each box
Fruit Snacks $.99 a box
Veggie Mozzarella Cheese $.99
Strawberries $2.98 for 2 lbs
Eggs for $.98 each (I forgot to mention in the video that I purchased 4 dozen)
Grapes $.77lb

This week's budget grocery haul for our family of 4.

Those are the best buys I found this trip. I ended up spending $58.52 for these two stops this trip. Not too bad for the week for our family of 4.

What good deal did you find while shopping this week?

Find More Grocery Hauls.

http://ift.tt/2tGGDjH

Friday, June 23, 2017

Frozen Strawberry Daiquiri

Frozen Strawberry Daiquiri Strawberry Daiquiri

I love a daiquiri, be it frozen or straight, strawberry or banana. It’s all good.

http://ift.tt/2rKT64r

10 Tips for Party Planning on a Budget

10 Tips for Party Planning on a Budget

We don’t have parties often, but I love it when we do.  Even though they can be expensive and a ton of work, it makes me so happy to have a houseful of friends and family.  Even when they get hectic, it just makes my heart feel full.  To help with some of the issues of the expense, I’m offering up some easy ideas for party planning on a budget.

Want to throw a party, but can't afford the expense of it? Here are ten tips to help you with party planning on a budget. | Real Life at Home

10 Tips for Party Planning on a Budget 1. Skip paper invitation.

If all or most of your guests are online (and regularly check their email), a service like Evite is a great option for free invitations.  Of course, an even more low tech option, while still being paperless, can be emails or phone calls.

2. Make your own cake.

If the party is a birthday party or another event that will involve cake, consider skipping over a store bought cake and either make your own cake or go for something like cupcakes or pies if you’re working on party planning on a budget.  Personally, I’m a big fan of cupcakes.  They are individually sized and there is no pressure on someone to cut a cake perfectly.  (Here’s my favorite frosting recipe.)

Tips for Party Planning on a Budget

3. Use what you already have at home.

If you’re determined to have a theme to your party, explore your home looking for supplies and other items that you might already have that would lend themselves to party decorations or supplies.

4. Throw a potluck.

If you want to have a meal but just can’t afford to invite all of your friends for a large meal, invite them to a potluck instead.  It would be best if you provided the drinks and main dish (soups, grilled out meats, or something of that nature) and then had friends or family bring sides and desserts.

5. Decorate with things you can reuse.

When we had a very large birthday party for Molly one year, we bought balloons to blow up ourselves as well as pink crepe paper.  Those were our only single-use decorations.

I also picked up a “Happy Birthday” banner that could be reused as well as LED white Christmas lights to put on the trees and our porch in the backyard.  Because they were LED, they were bright enough to light the dark backyard for all the kids that played outside throughout the party.  Those lights were not cheap, but we enjoyed them for many years afterward, as well as for additional parties and gatherings.

Birthday Banner

6. Accept help from friends.

If you have the kinds of friends who say, “What can I bring?” or “What can I do?” –  let them help.  Now, I will admit that I almost always decline those offers.

However, that said, I admire someone like my friend Amanda who trusts people enough that she had her sister-in-law (who is a friend of mine as well) and I make the cakes for her twin sons’ First Communion party.  Other relatives also brought some other desserts.

7. Avoid mealtimes for your party.

Food adds a large expense to party planning.  While I think it’s nice to have some type of food at a party, having it at a meal time will either cost you a lot of money or will leave your guests disappointed when your party time that starts at noon includes only cake and punch.  Have your party well after a meal time so you can get away with something like only cake and punch to save money on your party planning on a budget.

8. Make food from scratch rather than packaged foods.

If you would like to feed people, as I often do, it’s much cheaper to make the food yourself rather than heading to the grocery store or club store to buy prepared foods.

9. Skip party favors.

Who really needs party favors, right?  The only time we’ve ever done party favors was the year that Molly had a princess birthday party at home and the girls got to each pick a tea cup to use at the party and then take home.  However, we got them all for $1.00 or less per cup by visiting Goodwill.

Here are all of the details of the princess party we did at home for under $30.

10. Go somewhere that provides an activity.

Now, I’m not talking about something like a pizza party type of location if you’re trying to save money. I’m talking about something like a local park.  Some parks will let you rent a shelter for free or a small cost and then party guests can do activities like playing on playground equipment, sports, trails, and other activities.

What are some of your favorite budget savers when it comes to parties?


Other Posts You May Like:

Light and Airy Homemade Vanilla Frosting Recipe

Want to throw a party, but can't afford the expense of it? Here are ten tips to help you with party planning on a budget. | Real Life at Home

Disclosure: This post contains affiliate links. They don’t change the price you pay. However, when you shop through the links, we may receive a small compensation. Thanks!

The post 10 Tips for Party Planning on a Budget appeared first on Real Life at Home.

http://ift.tt/2t3mcQP

Thursday, June 22, 2017

Outdoor Lounge Space: How to Create an Eclectic Look

Outdoor Lounge Space: How to Create an Eclectic Look How to Create an Outdoor Lounge Space Eclectic

In our classic outdoor lounge space blog post, we gave you a guide for creating a look that’s elegant and timeless. This time, we thought we’d give you steps for creating an eclectic look. The vibe is funkier and laid…

http://ift.tt/2sFhrKk

Shrimp Quesadilla

Shrimp Quesadilla Shrimp Quesadillas

Quesadillas have to be my favorite go-to food for lunch. They’re just so easy to make! Especially when you have tortillas and cheese in the fridge, which we almost always do.

One way to take a quesadilla from snack to a meal is to add some protein, like chicken, beef, or in this case shrimp.

First marinate raw shrimp in a little lime juice and chili pepper. Then sauté the shrimp and add it to your jack-cheese quesadilla along with red onion and cilantro. Serve with some sliced avocado, sour cream, maybe another squeeze of lime juice, and you’re set!

http://ift.tt/1uVwQnW